I'm going to write here about my experiences with sous-vide cooking.
Commercial sous-vide cookers are available, but they are above my budget; the cheapest sell for around 500 euro, that's too much of an investment for something I might just try only once.
Instead I decided to build my own setup, following instructions on the internet.
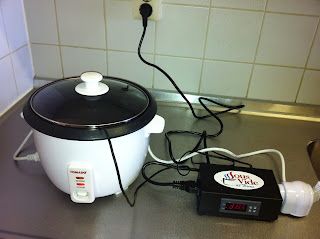
I bought a temperature controller and a cheap rice cooker. The rice cooker's power plug is connected to the temperature controller, so the controller can switch the cooker on and off to keep the temperature around the desired level.
This works: It keeps the temperature within a range of roughly 1 degree Celsius, that's accurate enough for all purposes.
Sous vide means 'under vacuum', so strictly speaking I would need a vacuum sealer as well. But you can achieve perfectly good results with a sealed plastic bag, filled with some oil or stock to make sure that the meat makes good contact with the water in the rice cooker.
Together this whole setup cost 150 euro, much less than 500 euro plus the costs of a vacuum sealer!
Here's a picture of my setup:
At the right is the temperature controller, which I bought from an Australia based company. It came with a useful manual which guided me past all the steps which I had to take.
I noticed that the bottom of the rice cooker would become quite hot, because that's where the heater element is located. Therefore I put a little plate on the bottom of the pan. This works, as long as the plate is not too thick; otherwise my rice cooker would not have enough power to heat the water above 55C.
